Explanation and Matching of CRA Parameters for Image Sensors and Lenses
- 27 Mar, 2025
CRA stands for Chief Ray Angle, which is the angle of the chief incoming light ray. Although both lenses and image sensors have CRA parameters, their actual definitions are distinctly different.
Lens CRA Parameters
The CRA of a lens is determined by its optical design and represents the angle distribution pattern of light rays from the optical center to the image plane. In other words, it is the angle between the chief ray (the ray passing through the center of the entrance pupil) at various positions of the lens after passing through the optical system to the image plane, and the normal line at the intersection point with the image plane.
As shown in the figure below, the chief ray angle varies across different positions of the lens. This means that the lens CRA is not a fixed value; rather, it varies depending on the field of view (FOV) position. For example, the figure below shows the chief ray angles corresponding to the 14°, 10°, and 0° fields of view for the Double Gauss 28 Degree Field optical system from the ZEMAX lens library, from top to bottom.
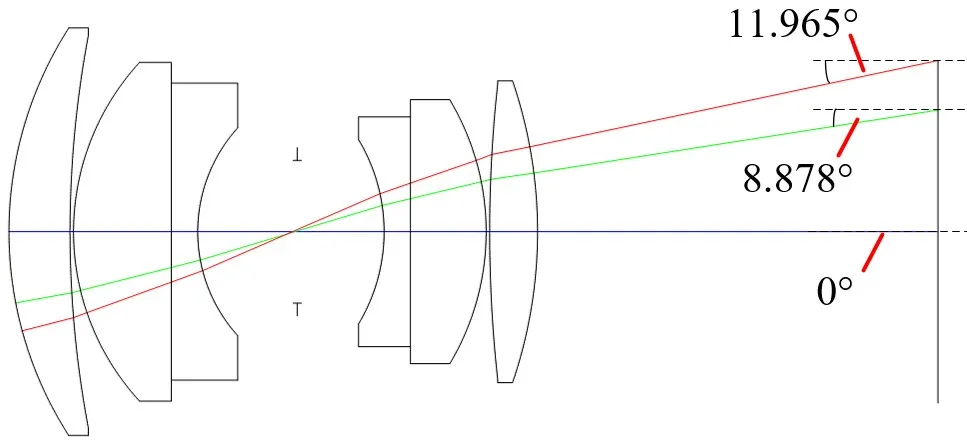
From the optical imaging ray diagram above, it can be seen that the larger the lens field of view, the larger its corresponding CRA angle. At the center position of the lens (the 0-degree field of view), the CRA can be considered as 0. The closer to the edge of the lens, the larger the CRA angle becomes. Generally speaking, when we refer to the lens CRA angle, we usually mean the CRA angle at the edge of the lens.
The figure below shows the normalized CRA corresponding to different image height positions for a specific lens model. The CRA at the center of the lens is 0, and the chief ray angles vary at different heights across the image plane, resulting in a CRA curve that changes with image height.
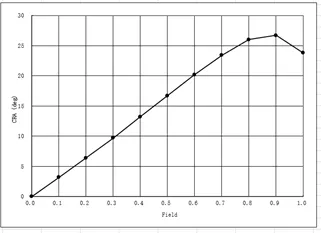
Image Sensor CRA Parameters
Compared to lens CRA parameters, sensor CRA parameters are slightly more complex.
First, every pixel on an image sensor has a tiny microlens on top of it, which is used to focus as much light entering through the lens as possible onto the photodiode underneath to achieve photoelectric conversion. As seen in the figure below, adding a microlens above the photodiode allows more light to be refracted onto the photosensitive surface, thereby increasing the luminous flux on the photodiode. This is the main function of adding microlenses.
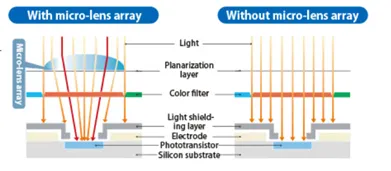
According to the microlens structure described above, if the light entering from the lens is incident perpendicularly onto the microlens (such as in the center region of the image sensor and lens), these rays can all pass through the microlens and enter the light-absorbing region within the pixel array. However, if the light entering from the lens hits the microlens at a certain oblique angle (such as at the edge positions of the image sensor and lens), after being refracted by the microlens, these rays will hit the metal layers inside the pixel (the gray areas in the figure above) instead of reaching the central absorbing region. This causes a decrease in light intensity in the light-absorbing region, leading to reduced sensitivity and increased optical crosstalk at edge pixels, as shown in the figure below.
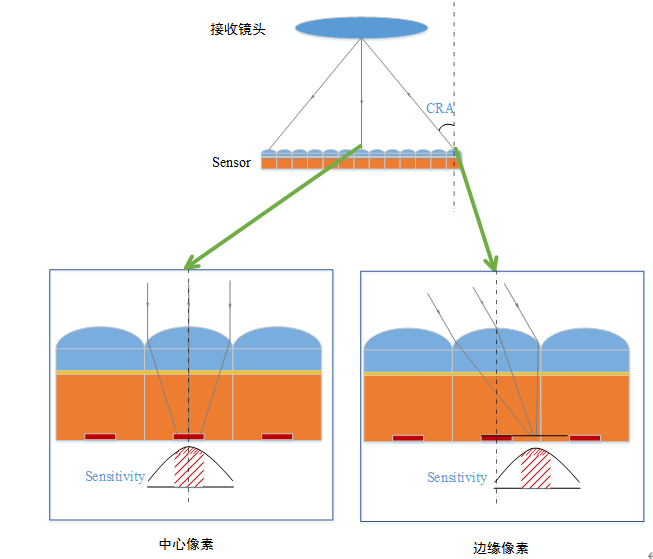
The above problem leads to the design of microlens shifting.
Microlens Shifting Design
To address the photosensitivity issue at the edge pixels of the image sensor (caused by oblique light rays from the lens hitting the microlenses), the microlenses need to be shifted by a certain distance. This allows the refracted light to refocus onto the light-absorbing region, recovering the light that would have been lost without the shift. As shown in the figure below, after shifting the position of the microlens toward the center by a certain distance, light incident at an angle is refracted by the microlens into the central light-absorbing region of that pixel.
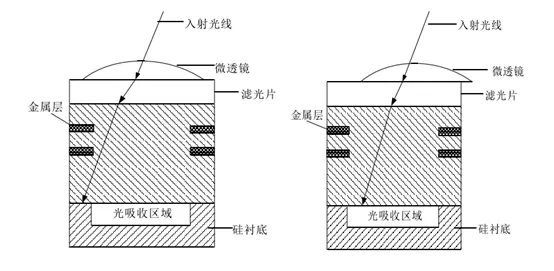
From the optical theory of lens CRA discussed earlier, the chief ray angle of the light entering the image sensor’s photosensitive surface through the lens is related to the positions of both the lens and the sensor’s photosensitive surface. In typical optical applications, the optical axis centers of the lens and the sensor coincide. Therefore, at the center of the sensor, the chief ray angle of the light passing through the lens is essentially perpendicular to the microlenses of the central pixels, allowing most of the light to be refracted by the microlenses into the central absorption region.
However, as you move outward from the center to the periphery, the chief ray angle of the incoming light from the lens becomes progressively larger. At this point, the microlenses on the pixels in the peripheral areas of the sensor can be processed with the aforementioned shifting technique. The direction and magnitude of the shift should correlate with the chief ray angle of the lens at that specific position. This is the issue of CRA matching between the lens and the sensor.
Sensor CRA is Also Related to Pixel Position
Following the same logic, for image sensor design, the shift direction and magnitude of the microlenses on the sensor pixels must match the chief ray angle of the incoming light they are expected to receive. This defines the CRA parameter required by the sensor. Similarly, taking the sensor center as the axis, the sensor center has a CRA of 0, and the CRA varies across different sensor regions extending outward, with the CRA increasing closer to the edges of the sensor.
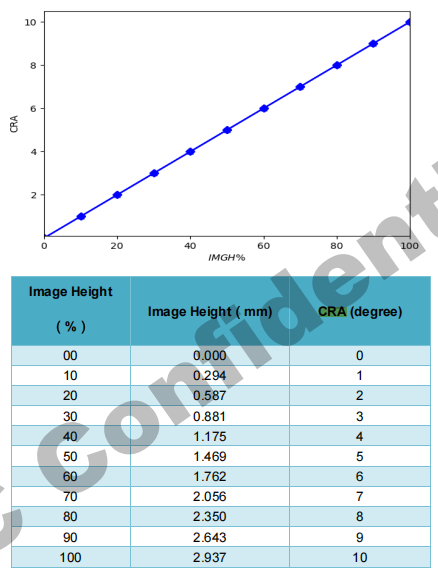
Below is the CRA data for the GC4653. The CRA at the center of the sensor is 0, while at the edge it approaches 10 degrees. Generally speaking, the CRA data seen in sensor datasheets refers to the maximum CRA angle at its edges.
Sensor and Lens CRA Matching Selection
During the selection process for an image sensor and a lens, special attention must be paid to the matching of their CRA values. The ideal scenario is a perfect match between the lens CRA and the sensor CRA, which yields the highest light collection efficiency. However, in practical applications, a perfect match is difficult to achieve. In such cases, it should be ensured that the difference between the lens CRA and sensor CRA is controlled within 2 to 3 degrees.
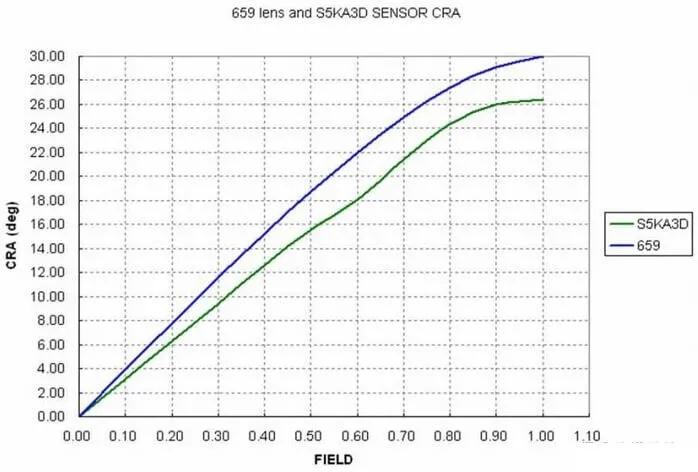
If the CRA of the sensor and the lens do not match, refractory image quality issues will arise during later tuning that are difficult to resolve:
- When Lens CRA > Sensor CRA, the light entering from the lens will exceed the correction capability of the sensor microlenses, resulting in adjacent pixel crosstalk (Color Shading) in the final image, which manifests as color distortion at the edges of the image.
- When Lens CRA < Sensor CRA, the light entering from the lens cannot cover the pixel edges, causing a loss of photosensitive area (Luma Shading), which manifests as dark corners (vignetting) around the image.
During actual image IQ tuning, because Color Shading is more difficult to correct via the ISP in post-processing compared to Luma Shading (uneven brightness), it is recommended to choose a solution where the Lens CRA is slightly smaller than the Sensor CRA during the component selection phase.
Image Issues Caused by CRA Mismatch
As mentioned above, when the CRA of the lens and the sensor do not match, certain image artifacts occur. So, how exactly are these image issues generated?
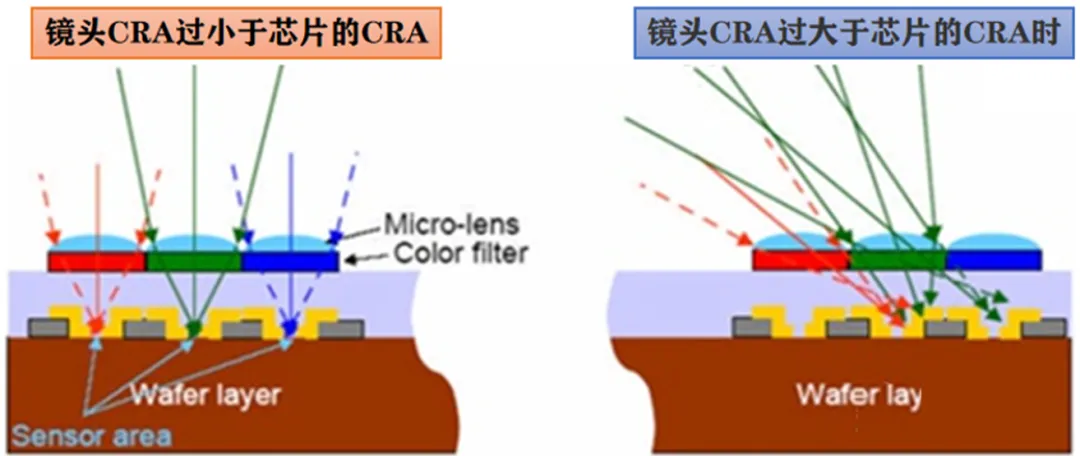
Referring to the figure above, when the lens CRA is significantly smaller than the sensor CRA, the light entering the microlenses of the pixels at the edge of the sensor is refracted into the non-photosensitive areas of the pixels. The luminous flux that the photosensitive area can absorb is too small, resulting in darker areas around the edges of the image—this is the Luma Shading problem.
Conversely, when the lens CRA is significantly larger than the sensor CRA, the CRA of the light entering the edge pixels of the sensor is too large. After being refracted by the microlenses of the edge pixels, these light rays spill over into neighboring pixels of different colors, causing interference between pixels. This is the Color Shading problem.